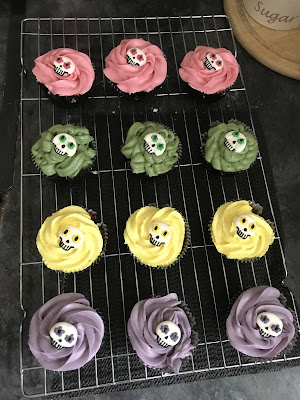
Spooky Season is upon us! Yes it's finally October which means Halloween one of my favourite times of the year is drawing near. Which means not only do I get to decorate my room all spooky and cute but I get to bake as many Halloween bakes as I like and nobody can stop me.
Today we're starting with the simple, perfect for starter bakers cupcake recipe. I picked up these Sugar Skull decorations up from The Range in the Summer and have kept them safely tucked away until now. From the beginning of brainstorming what I wanted to do with these, I knew I wanted to do matching icings for each of the designs. However I originally planned to just make them all one flavour until I was sat pulling out the relevant colours and flavourings. And then I found myself picking out four different flavourings that work wonderfully with the simple but delicious vanilla sponge that sits underneath them. You don't have to do four different colours or flavourings but I love to play with colour and flavour when I'm baking so these seemed like the perfect excuse to let my creative side out a little more.
Ingredients
For The Cupcakes
- 100g Stork/Margarine
- 100g Caster Sugar
- 100g Self Raising Flour
- 2 Eggs
- 2 Tsp Vanilla Extract
For The Buttercream
- 200g Butter, softened
- 320g Icing Sugar
- Two Teaspoons Of Your Chosen Flavouring/ Flavourings
- Purple, Green, Pink And Yellow Gel or Paste Food Colouring
- A Pack Of Sugar Skull Decorations
Method
1- Pre heat oven to 180C. Line a twelve hole muffin tin with paper cases.
2- Into a bowl place your stock and caster sugar. Using a spatula, wooden spoon or stand mixer cream together until it's pale in colour and fluffy in texture.
3- Add one egg followed by a tablespoon of flour. Beat until combined.
4- Repeat with the other egg and another tablespoon of flour. Beat until well combined, scraping the edges of the bowl so nothing is left sitting on the sides.
5- Fold in the rest of your flour and the two teaspoons of vanilla extract. Take care when folding in your flour as you don't want to knock the air you've just built up out the mixture.
6- Spoon into your paper cases and bake for 20-25 minutes or until a skewer comes out clean. Leave to cool in the tin for five minutes and then transfer onto a wire cooling rack to cool completely.
7- Now it's time for the buttercream. Place your softened butter into a bowl and beat until smooth and soft in texture. I highly recommend using a hand mixer or stand mixer for this bit as it does have a tendency to take a while.
8- Once your butter is the right consistency, add half of your icing sugar and mix again. If you're using a hand or stand mixer be sure to start slow and build up the speed otherwise you'll be covered in icing sugar.
9- When you see buttercream starting to form, add the other half of your icing sugar and beat until fully combined. I always take time to scrape around the sides of the bowl so nothing is left sitting on the sides. And if your buttercream seems a little stiff, mix in a splash of milk and you'll have the perfect piping consistency.
10- Now comes the fun part. As evenly as possible, split the buttercream between four separate bowls. Into each one add your different flavouring/colour combination you've chosen. I chose to flavour the pink cupcakes raspberry ripple, the purple vanilla custard, the yellow were lemon and the green were strawberry. But you can easily flavour them however you like or you can leave it as plain vanilla buttercream.
11- Once you've created your colourful masterpieces, spoon each buttercream into separate piping bags and ice your now cooled cakes. I used a variety of piping nozzles but my favourite is the Wilton 2D Flower nozzle. You'll notice that two of the colours have the same style piping as I just happen to have two of those nozzles.
12- Once you're happy with your piping, gently place a sugar skull decoration on top and leave to set.
13- Then all that's left to do once you've tackled that mountain of washing up this recipe has created is to enjoy them. These are perfect to make with the kids, for the kids or as an easy yet fun recipe if you're an amateur baker.

No comments:
Post a Comment