Wednesday 28 February 2018

What I Read: February

Last month I started a new monthly series sharing the books I'd read from the last four weeks in an attempt to fufill my yearly goal of reading more. It went down better than expected so today I'm back with February's books. Now I'm disappointed to say that I only managed to read two books this month but it's not for lack of trying. But don't worry because next month's post will be a lot longer (hopefully). 

My Not So Perfect Life- Sophie Kinsella 
The first book I read in February comes from one of my favourite authors. Sophie Kinsella is best known for the Confessions of a shopaholic series but also has a fair few stand alone novels, of which this one I think has to be the best. Katie the main character is extremely relatable and the theme of making life look perfect on social media is very relevant with the world we live in today. I couldn't put this book down, rooting for Katie as well as growing to love a character who was first introduced in a less pleasant manner. I read the majority of this one Sunday afternoon as I just wanted to know what happened next, something Kinsella is very good at doing in her books. It's made me want to go back and retread both her Confessions of a Shopaholic series as well as her other stand alone novels. 

Edge Of Darkness- Karen Rose 
And the only other book I managed to read this month comes from another of my favourite authors. Karen Rose is the queen of Crime novels in my eyes. Her stories are gruesome, addictive but also always contain a love story and well connected never ending set of connections established in previous novels. Edge Of Darkness is no different and I found myself devouring this book night after night to work out who the killer was as well as hanging on tenterhooks to see if the lead detective and his long time love would go together for good. I think this book is the reason why I haven't read anything else this month. It was so good and kept me on edge the whole time that I just couldn't get into another book as I just wanted to read this one all over again. 

Tuesday 27 February 2018

Monthly Favourites: February

                                
Where on earth has February gone? It's like I've blinked and missed it. I honestly can't believe it's going to be March in a few days. And because the month has gone so quickly, I haven't really had time to try out a ton of new products to call my favourites. In fact I've rediscovered a couple of old products that I've fallen in love with all over again. 


Out of the three beauty favourites I have this month, my absolute favourite is the new Rosie For Autograph Amazing Skin Secret Foundation. It's been the only foundation I've reached for during February and there's a good reason for it. It's medium coverage has been everything my skin has needed to make it look healthy, glowy yet covered and still skin like. It lasts well on the skin and surprisingly looks better after a few hours wear than when its first applied. It's the perfect foundation to transition from Winter to Spring and I can see myself getting a lot more wear out of it in the upcoming months. 


My second beauty favourite of the month is a rediscovery from Barry M. Their Ready Set Smooth Loose Setting Powder was a favourite of mine last year but got put to the side as I discovered other powders. However this month I found myself reaching for it and loving the results all over again. It's invisible look and feel on the skin has really changed how my make up looks, even a few hours of wear. It's helped stop my concealer from creasing under my eyes and because it's transparent, it's not made my foundation oxidise or given my skin a warmth that it certainly doesn't need. 


And the last beauty favourite I have this month is one that's been sitting in my collection for about a year now and was only rediscovered when I had a lipstick sort out. The Milani Amour Matte Lip Creme in Precious has been one of three lip products I've reached for throughout the month of February. It's a stunning peachy pink colour that gives a nice twist on your normal neutral and gives a spring like pep to a look to brighten up these dull, cold winter days. It does dry down matte on the lips but because it's more of a mousse/creme formula than your standard liquid lipstick, it's a lot more comfortable to wear than others. I can see myself getting a lot of wear out of this throughout Spring and am thinking of investing a few other shades to see if they're as good as this one. 


One of only two non-beauty favourites I have this month is the return of Strike Back. I spoke about this back in November when the reboot started it's ten episode run but can't help but talk about it again as it comes to it's series end. I honestly didn't think I could love a reboot as much as the original but I do in fact love the new cast and team better than the original. There's something a little more raw about the new team that I adore and that keeps me glued to my TV every Wednesday at 9. I'm sad that the final episode airs this week but I have high hopes for another series and until then I can always watch reruns or start the entirety of Strike Back from the beginning. 

                         
And the last favourite of this month, is the latest editon to my ever growing piercing collection. Please excuse the slightly gruesome picture, this was taken just after I got it done and I haven't been able to get a decent picture since, I think it's the angle that makes it difficult. Earlier in the month I got my Daith pierced and I absolutely adore it. It's still in its healing phase so there are still days where it feels freshly pierced but that doesn't take away from how well it sits in my ear and blends seamlessly in with the rest of my piercings. I'd been looking at getting this done for a while and finally bit the bullet this month. I'd like to say this is my last piercing but give me a few months and I'll be craving another one (as if I didn't already have enough- double helix, rook, conch, daith, tragus, forward helix and nine separate lobe piercings). I've got my eye on a snug or anti-tragus next so watch this space in a few months, you never know what I'll get done next. 

Friday 23 February 2018

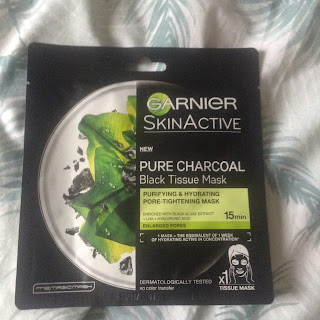
Review: Garnier Pure Charcoal Black Tissue Masks

If you've been reading the blog for a while you'll know I'm a huge fan of the Garnier Moisture Bomb Tissue Masks. So of course when I saw they were releasing a charcoal tissue mask I had to get one. Now these aren't the first of their kind but they are a first from Garnier and I predict that this is only the beginning of a whole new range from them.

The first of the two mask range is enriched with Black Algae Extract as well as LHA and Hyaluronic Acid. It's aim is to purify, hydrate and reduce the apppearence of enlarged pores making it perfect for those with an oilier skin type.


 And the second mask alongside LHA and Hyaluronic Acid is enriched with Black Tea. It aims to hydrate and purify skin whilst removing signs of excess shine/sebu, essentially giving skin a more matte appearence after use. Again this is perfect for those with more oily skin as it'll help with the creation of excess sebum.


I like these masks, they felt nice on the skin. They didn't drip everywhere or slide off my face when I moved but I just felt that they didn't do a lot for my skin. I think a lot of it had to do with my skin type. Normally, I lean more towards sensitive/dry unless my skin is hormonal and then it leans more towards sensitive/oily so I think that's why I didn't see any particular mind blowing result from these masks. If you're more of a combination/oily skin type then I think these will work wonders but apart from leaving my face feeling moisturised, I didn't feel like these masks worked for my skin. That being said though, they are suitable for those with more sensitive/reactive skins, in fact they're suitable for all skin types but I believe those with combo/oily skin would get the best results from them. I'm in no way saying that these masks are a bad product, they just didn't work for my particular skin type and to me makes it seem a bit of a waste to repurchase in the future when I could just save money by buying a product that actually works with my skin.

Wednesday 21 February 2018

Review: Rosie For Autograph Amazing Skin Secret Foundation

When a brand releases a new foundation, I don't usually rush out to buy it. But when I saw that Rosie Huntington-Whiteley was releasing a foundation as part of her collabrative brand Rosie For Autograph with Marks and Spencers, I just had to get myself a bottle.

The Amazing Skin Secret Foundation is a lightweight, breathable, medium yet buildable coverage foundation. It's weightless formula makes it comfortable to wear and leaves skin feeling hydrated, smooth and luminous. It also has a SPF of 30, the highest I've ever seen in a foundation and is oil free, fragrance free, alcohol free and hypoallergenic making it suitable for all skin types. There are eight shades in total ranging from Bare to Deep Tan and as someone who finds it difficult to find the perfect shade, I found it pretty easy to find my perfect shade within the range.

This foundation is my dream foundation. I can not get over how good this leaves my skin looking and how good it is as a product in general. Even though the foundation is lightweight in formula, it doesn't lack in coverage. It's medium coverage is enough to cover any blemishes, redness or imperfections my skin has, even when it's at it's worst. Building the coverage is easy and doesn't go cakey or mask like unlike other foundations with the same coverage. It lets skin look, feel and breathe like skin and whilst it has a healthy glow, it doesn't make your skin look like an oil slick or sweaty.

What impressed me the most though with this foundation was it's staying power. Normally after a few hours, my foundation has faded around my nose and lip area. This doesn't do that, in fact it doesn't budge until you remove with your cleanser of choice. Normally I can't wait to take my make up off as I don't like the feeling of it clogging down my pores but with this foundation, I can happily wear it all day without worrying about the effects it's going to have on my skin.

In fact I wore it for about twelve hours this Friday just gone, including two lip changes, dinner and a midnight snack when I got home. But none of that bothered this foundation. In fact, it looked better twelve hours after application than it occasionally does on a normal day. My skin still looked flawless, it didn't feel heavy or weighed down, hydrated and soft to the touch, something I've never 
experienced with other foundations.

Normally I don't like spending a lot of money on foundation and whilst this isn't overly expensive at £20 a bottle, I'm more than happy to pay that time and time again for this foundation. It's really changed how my skin looks and feels and that has really given me a confidence boost. I knew that if it was anything like the Rosie For Autograph Sheer Finish Complexion Enhancer then M&S were onto a winner but I didn't expect it to be blown away as much as I was. If you get the chance to test this in store, I highly recommend you do, you never know you may find yourself purchasing a bottle.

Monday 19 February 2018

Review: Maybelline SuperStay Matte Inks

When Maybelline released their SuperStay Matte Inks, I was at first intrigued then dubious and now I'm obsessed.

If you've never heard of the SuperStay Matte Inks before they're a highly pigmented liquid lipstick that are advertised as lasting flawlessly on the lips for 12 hours with a comfortable and effortless matte finish. To me that's a bold claim, something I definitely couldn't resist putting to the test.

I have three shades from their eighteen large range, spanning from stunning nudes to beautiful bolds with a few unique shades thrown inbetween. From top to bottom I have Ruler, Pioneer and Voyager. Ruler is a stunning deep pink shade, Pioneer is a bright red shade and Voyager is a gorgeous burgundy shade. Each shade is unique and different to the others in the range and it's one of the many reasons I love this range from Maybelline.

Now you may be wondering why I brought three different shades if I was dubious about the product. But I'm pretty sure a lot of you would have been the same once I explain it to you. They're advertised as a Matte Ink. To me that meant they should have dried down completely when they were on the lips and not budged. Yet when I first tried them, there was still a bit of tackiness to them even after they'd been on the lips for a while and for me that just seemed like a wasted opportunity for a good product.

But before you think this is going to be a debbie downer post, they actually did live up to the claim that they wouldn't budge. And they don't, they have some serious staying power. I can easily and happily eat a greasy burger and these lipsticks don't budge. Like seriously don't budge. I can wear these for a good six to seven hours and there is no fading, flaking and they're still relatively comfortable to wear. In fact it actually takes a very strong oil based make up remover to take these off and even after then there is a slight chance of staining.

Sure they don't dry down to your traditional matte finish but these liquid lipsticks are a brilliant release for those who like the staying power of a liquid lip but not the powdery, drying texture a lot of them have. The Maybelline SuperStay Matte Inks are lightweight, long wearing, comfortable, highly pigmented and eye catching and possibly one of the best high street lip releases in a while. With an ever expanding shade range, I predict these liquid lipsticks are going to be one of 2018's most raved about lip products.

Friday 16 February 2018

3 Things I've Done To Clear My Skin

 
Over the last few months my skin has been a fickle thing. One moment it'll be at it's clearest, meaning I can go make up free and feel confident about myself but then in the next moment, I've got mini mountains popping up all over my face. Now I like to think that I take good care of my skin but over the last couple of months, I've been making sure to take that bit more care of it. So today I'm sharing with you three things that I've been doing to help clear my skin up and get it to a place where I'm happy with it again.

1- Acid And Oil
Now this may seem like two steps but is in fact a combination. And it's come in specially handy when I've been battling breakouts. I've been going between using AHA based products and BHA based products. When the blemish first appears I go in with an BHA based product, usually something containing Salicylic Acid and concentrate on applying it over the blemish and the surrounding area. This works to bring the blemish to a head which means you can then pop it (yes I'm a popper) and then go in with your other products to help clear your skin. Then when the blemish is healing, I go in with an AHA based product, something mainly Glycolic based to get rid of any dry skin around it, therefore making it less likely for me to pick and essentially scar my face.

And to stop my them from leaving a scar, I've been going in with a facial oil. Facial oils used to scare the shite out of me but recently I've been obsessed with them and can't get over the wonders they've done for my skin. Because oils penetrate deeper into the skin than a moisturiser does it gives cells a boost during their renewal which reduces the appearance of dark marks and helps reduce the likeliness of scarring from blemishes. A few drops applied after cleansing and a AHA based toner is enough to reduce the likeliness of blemish scarring as well as nourish skin for a longer period of time and renewing skin's natural radiance.

2- Drink More Water
This is something I still need to work on but I can clearly see the difference when I actually manage to drink more water than coffee. Water is the best way to hydrate skin and hydrated skin means that skin will look more plump, softer to the touch and problems such as redness and dark circles will look reduced. Not eradicated but lessened enough to boost your confidence. And whilst it does sound easy to do, I always find myself wishing I'd drunk more water because it really does show on my skin. So for the last week I've been trying my best to get more water in my system and I've managed it. And do you know what, my skin looks better for it. Except for a hormonal breakout on my chin, my skin looks the clearest it has in a while.

 3-Detoxify Skin
And the final thing I've been doing is detoxifying my skin. Once a week, I've been using a deep cleansing charcoal based face mask alongside my routine of cleansing and exfoliating. And whilst I occasionally have to deal with breakouts caused by them, I don't mind because my skin always looks clearer once they've gone. I like charcoal based masks as they work deeper into the pores and draw out any excess leftover make up, dirt or daily grime that can block pores and lead to blemishes. Some are definitely stronger than others and if you have particularly sensitive or reactive skin, I'd say stay away from them as they'll not only draw out impurities but irritate and dry skin out. A good deep pore cleansing mask perfect for those with sensitive skins comes from Loreal. It's more clay based than charcoal but still works deeper into pores and doesn't cause irritation if you have a more sensitive skin. And whilst some of you may ask why a deep cleaning mask is important, a lot of you already know that whilst cleansing keeps skin looking and feeling clean, it doesn't always work at removing everything. That means dirt can still accumulate in pores and cause issues but a deep cleansing mask once a week helps remove that build up and can prevent blemishes appearing or help reduce existing blemishes. It's the one trick that I know works wonders for my skin and I'm sure it'll work the same for your skin as well.

Wednesday 14 February 2018

GRWM: Valentine's Day

 
Happy Valentine's Day or just Happy Wednesday depending on how you're spending today. I for one will be at work and then indulging myself in a good old pamper and a not so romantic new episode of Strike Back. And even though I'm going to be at work, I'm going to make myself look and feel as if I'm spending the day with the man of my dreams instead of asking if people would like to buy a 5p carrier bag.

I may not have an impressive, groundbreaking plans for the day but it doesn't mean I don't want to look good. So I started the day with a little pep, starting with the Rodial Dragon's Blood Under Eye Patches. These work wonders at reducing any signs of puffiness and darkness as well as hydrating and plumping the under eye area. Plus after waking up, these are ultra cooling and really wake you up, something I'm extremely grateful for.

Then I popped on a bit of the GlamGlow ThirstyMud Treatment. This is one of my all time favourite leave on masks and it's one I always break out when I want to look good and feel good about my skin and myself in general. A thin layer of this is all my skin needs to look hydrated and feel soft to the touch. I left this one whilst I enjoyed a cuppa and some breakfast before carrying on with my normal morning routine.

Then it's time for make up. I'd like to say that I'm using a different primer combination today but unfortunately I'm not. And it's not because there isn't other primers I like because there is but I know that this combination keeps my make up locked in place for as long as I want it to be. I go in first with the Barry M Hydro Fix Primer Water. Not only does this help keep my make up in place but it also locks in hydration so my skin doesn't start to feel tight or dry as the day wears on. And then it's the Maybelline SuperStay Primer over top. This is lightweight and skintone in colour but it works really well to even out skintone and blur away any imperfections without that slippy silicone feel that doesn't agree with all skintypes, mine included.

Then because I've been having a couple of skin issues, I'm going in with some colour correctors. I love the Collection Colour Correctors as they're pigmented enough to actually cover and correct what I want but they don't weigh skin down or leave skin looking cakey. The Green corrector is my go to for correcting any redness on my cheeks or redness left behind from blemishes. And whilst the Rodial eye patches reduce the appearance of my dark circles, the Lemon corrector just brightens the area even more and makes concealer apply more evenly and opaquely over top.

For foundation I went in with the Rosie For Autograph Amazing Skin Secret Foundation and my trusty beauty blender. This has a stunning medium coverage that gives skin a beautiful healthy glow but doesn't look to over the top or sweaty. A couple of pumps is enough to o my entire face in a skin like and non cakey way. Once bopped in with a damp beauty blender, this gives skin a flawless, perfected yet natural and skin friendly finish.

After using the Rosie For Autograph foundation, there isn't a lot of need for concealer but I'm still going to go in with a little to perfect a couple of imperfections that the foundation didn't quite cover. The first concealer I went in with is the Maybelline The Eraser Eye Concealer. It's got enough coverage to cover my dark circles but it isn't too heavy or cakey under the eye. I take the edge of my damp beauty blender and bop it into the my under eye area, making sure that it blends in seamlessly with my foundation. Then for a couple of blemishes and along my forehead I went in with the newest shade of the Collection Lasting Perfection Concealer. They now do it in Extra Fair which matches my skintone perfectly and blends seamlessly into my foundation of choice.

I'm always quick to set everything into place and today is no different. I've run out of pressed powder so today I'm going in with the Barry M Ready Set Smooth Setting Powder. I forgot how good this powder is and how flawlessly it sets my make up. A bit of this dusted under my eyes with the Real Techniques Setting Brush sets everything is place without looking powdery or creasy. Then with my trusted B Powder Brush, I dust a small amount around the edges of my face and down my t-zone, making sure to keep the healthy glow the foundation has given me along my cheekbones.

Then it's lash time and there is only one combination I was going to be reaching for. The Maybelline Total Temptation alone creates the must defined luxurious looking lash look but paired with the Maybelline Lash Sensational Lash Primer it goes out of this world. The pair together give me fanned out, defined, lengthened and volumised lashes that don't droop, fall, flake or crumble. And because there is a primer underneath, if my lashes do droop slightly, it's not hard to get them back into place with a gentle upward push.


I was going to go down the traditional route and go with a red lip like I normally do on Valentine's Day but this year I've found myself reaching and enjoying more pink toned shades so that's what I chose. I started off with the Kiko Intensly Lavish (sadly discontiuned) Lip Liner in 01. It's been my go to lip liner when I've worn a pink a lip recently. Then over the top I used the Milani Amour Matte Lip Cream in Precious. It's not the usual pink tone I'd go for but once it's on the lips and dried down, I really like how it looks. And because it's more of a velvet finish, it means it's going to feel comfortable on the lips for a lot longer than your standard liquid lipstick. I love how it compliments my skin tone even though it's not the usual pink tone I'd go for.

. Now I've gotten my look complete, all that's left to do is give myself a spritz of setting spray. And the best one for keeping my make up in place is the Collection Primed and Ready Fixing Spray. It's lightweight so it doesn't disrupt my make up and sets everything in place with a semi-matte finish that still allows skin to look and feel like skin.

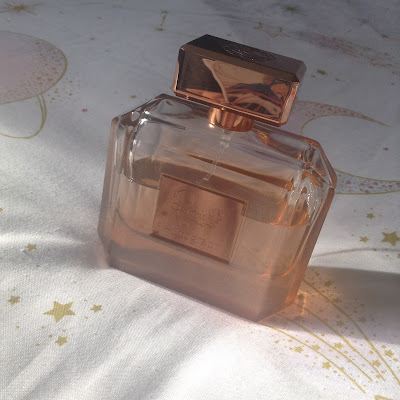
Then the final thing I do is spritz myself with perfume. And the one that's most fitting Valentine's Day/Galentine's Day for me is the Rosie For Autograph Rose Gold. It's got a warmth to it that never fails to make me feel ultra feminine and good about myself. It's centered around the original Rose Centifolia scent that emcompasses all of Rosie's fragrances but this has added notes of musk, sandalwood and vanilla that gives it more depth and warmth that lasts throughout the day. Now I'm ready it's time to go and enjoy my Valentine's, even if it's just a day of work then a pamper.

Monday 12 February 2018

Recipe: Strawberries And Cream Cupcakes

Valentine's Day is only a couple of days away and I'm back with my second Valentine's inspired recipe. Today I'm playing with a bit more colour and flavour to try and recreate as closely as possible the taste of the Lindt Strawberries and Cream chocolates that are always released around this time of the year.

Ingredients
- 110g Butter/Stork, softened
- 110g Caster Sugar
- 110g Plain Flour
- 2 Tsp Baking Powder
- 2 Medium Eggs
- 3 Tsp Strawberry Extract
- 1 Tube Of Dr Oetker Pink Gel Food Colouring
- 1 Tub of Berry Crocker Vanilla Buttercream Icing

Method 
  1. Pre-heat the oven to 180C. Line a 12 hole muffin tin with paper cases. 
  2. Place the softened butter into a bowl alongside the caster sugar and blend with the paddle attachment of a stand mixer until pale and fluffy. You can also do this by hand with a wooden spoon or a spatula. It'll just take a little longer. 
  3. In a seperate bowl, sift together the plain flour, cocoa powder and baking powder. Add to the mixture making sure to not do a me and spill flour everywhere.
  4. Beat the eggs together and add to the mixture. 
  5. Then it's time for your flavouring of choice. As I'm trying to recreate the taste of the Lindt Chocolates, I'm going in with Strawberry flavouring. I normally only use two teaspoons of flavouring but because I wanted this to be quite strong, I added a third. 
  6. Now all of that's in the bowl, mix it all together until well combined. Always take a silicone spatula and scrape along the sides of the bowl when you do this to make sure everything is fully incorporated. 
  7. Then it's time to add the food colouring. With the tubes of Dr Oetker Gel Colouring, it's always best to add it in gradually, mixing it in between each addition. You don't have to use the whole tube but because I wanted them to be bright pink, I used the whole tube. Maybe overkill but it looked pretty. 
  8. Once you've achieved the colour you want and everything is completely combined, it's time to spoon the mixture into the paper cases. Then it's time to pop them in the oven and bake for 20-25 minutes. 
  9. Once cooked, leave to cool for five minutes in the tray and then transfer them over to a wire cooling rack to cool completely. 
  10. And like with my Red Velvet Cupcakes, I cheated with the icing. I'm no good at Buttercream or piping gorgeous designs so I went in with what was left of my Betty Crocker Ready To Use Buttercream. A spoonful is enough to cover the top of each cake and I just went in with a pallet knife to smooth it out and create a somewhat decent design. 
  11. Then it's just a case of leaving the icing to set. Then once it's set, it's time to enjoy them with friends, family or your one and only.

Friday 9 February 2018

Recipe: Red Velvet Cupcakes

Valentine's Day will soon be upon us and I felt like baking some Valentine's inspired recipes that could be baked for your one and only or a treat for you and your girls if you're doing Galentine's Day. And what a better sweet treat than Red Velvet Cupcakes. They're something I've wanted to bake for a while and now I have my Sugarflair Extra Red Colouring, I can bake them whenever I want. I don't believe this is a conventional recipe for Red Velvet but they taste good and have gone down well with family and friends.

Ingredients
- 110g Butter/Stork, softened
- 110g Caster Sugar
- 110g Plain Flour
- 2 Tsp Baking Powder
- 2 Tsp Cocoa Powder
- 2 Medium Eggs
- 1/4 Tsp Sugarflair Extra Red Food Colouring
- 1 Tub Betty Crocker Ready To Use Vanilla Buttercream

Method 
  1. Pre-heat oven to 180C. Line a 12 hole muffin tin with paper cases.
  2. Place the softened butter and sugar into the bowl and beat until pale and creamy. I used my stand mixer for this and can't get over how quick and easy it was to cream them together.
  3. Sift together the baking powder, flour and cocoa powder then add to the mixture. I find sieving them into a separate bowl first works better than trying to get the sieve around my mixer. Plus you're less likely to make a mess that way. 
  4. Beat the eggs and add to the mixture. 
  5. Combine everything together, making sure to scrape around the sides of the bowl so that everything is fully incorporated. 
  6. Add the food colouring. The Sugarflair colouring is so highly pigmented that you only need the tiniest amount to make a bright red shade that is custom to Red Velvet cupcakes. 
  7. Once everything is combined, spoon evenly into the paper cases and pop into the oven for 20-25 minutes. 
  8. When they're cooked, leave to cool for five minutes in the tin, then transfer to a wire cooling rack to cool completely. 
  9. Once completely cooled, I did cheat and use ready made icing. Sadly buttercream and icings of any kind aren't really my forte even though I am working on them. So for these I cheated and used a tub of Betty Crocker's Ready To Use Vanilla Buttercream icing. I took a small teaspoon and placed a dollop of icing on each cupcake before using a pallet knife to smooth it over the top, adding more icing if necessary.  
  10. Leave the icing to set, then once it's set enjoy. 

Wednesday 7 February 2018

Review: Nip And Fab Glycolic Fix Extreme 6% Liquid Glow

I absolutely adore the Nip and Fab Glycolic Fix Extreme Pads and thought 5% Glycolic Acid was the highest the brand had to offer. But then they released their Glycolic Fix Extreme 6% Liquid Glow Toner and blew their pre soaked pads out the water.

The Liquid Glow Toner is a 6% Glycolic Acid based toner that works to loosen and remove dead skin cells whilst simultaneously working deeper into pores to unclog them, to reveal smooth, soft and radiant looking skin. However it's not stripping or drying as it contains a mixture of Hyaluronic Acid and Vitamin B5 to help maintain skin's hydration levels, leaving it feeling softer and smoother for longer.

I was really looking forward to trying this product, it seemed to be along similar lines to the Pixi Glow Tonic and Alpha H Liquid Gold. However unlike those products, these broke me out and to begin with I was confused. The breakouts weren't everywhere, they were more around my chin and around my forehead and eyebrows, places that I tend to get a lot of skin congestion anyway. But back then I didn't know that this product was good for clearing deep into pores and just thought I'd reacted badly to it. However don't let that put you off, once I'd taken a step back and then went back to it, this product has done nothing but wonders for my skin. 

It leaves a slight tingling sensation on the skin after you use it but that just means that the Glycolic Acid formula is working to loosen and remove those dead skin cells that are stopping skin's radiance from shining through. And then you can just leave it at that. The Hyaluronic Acid in the formula means you can skip the moisturiser until later so that the formula really has a chance to exfoliate and retexturise skin. And then the next day after you've used it, skin feels softer, smooth and the appearance of texture isn't completely gone, it's clearly diminished and skin has a healthy glow to it.

This is perfect for pretty much every skin type except those with extremely sensitive/reactive skin but it does all come down to your skins ability to handle AHA's. If your skin reacts well to acids such as Glycolic or Lactic then you could probably get away with using this every other day where as if your skin doesn't react well with acid based products, I'd say either stay away from it completely or limit use to once or twice a week. I'm nearly halfway through the bottle and know for a fact that I'll be repurchasing it once I've run out. Plus if you buy it now at Superdrug, you can get this toner which retails at £19.95 alongside another Nip and Fab product and only pay £18 for the two.

Monday 5 February 2018

Review: Loreal Smooth Sugars Scrubs

 
When Loreal released their Smooth Sugar Scrubs, I was surprised. In a good way I assure you. It was because I didn't think we in the UK would be getting them as soon as we did. I'd seen them promoted on Instagram but it had only said that they'd be soon available in the US. Hence my surprise when I saw them in the skincare aisle.

The Smooth Sugar Scrubs are a blend of brown, blonde and white sugars combined with ingredients such as Kiwi, Cocoa Butter and Grapeseed Oil to clear, nourish or enhance skin's radiance whilst simultaneously exfoliating skin. And because these scrubs use a natural exfoliant in the form of sugar they aren't going to mysteriously disappear when the ban on the use of micro beads in exfoliators becomes more widespread.

 The Clear Scrub contains Kiwi Seeds alongside the triple sugar formula that exoliates skin but also works deeper into pores to help remove and lessen the appearence of impurities and blackheads. It's self heating formula melts the sugars into the skin as you use it, eradicating the horrid scratchy feeling associated with many exfoliators that essentially cause skin to feel stripped or irritated after use. This is probably my favourite out of the three, it leaves my skin feeling soft and clean but not dry or tight where essentials oils have been taken away by the exfoliating particles.


The Nourish Scrub contains Cocoa Butter to nourish, soothe and soften skin. This one is more of a balm texture and a little goes a long way. It doesn't feel as gritty s the Clear Scrub but it still does a magnificent job of exfoliating skin. The Cocoa Butter is brilliant if you have dry or sensitive skin as it'll work to nourish skin and leave it feeling softer for longer. I like to use this one when my skin is feeling a little more tender and in need of some TLC.


And finally the Glow Scrub contains Grapeseed Oil exfoliate, nourish and reveal skin's radiance. This is the one that I think doesn't do as much as the others. The Grapeseed Oil formula nourishes skin and leaves it feeling soft and smooth after every use but for me personally doesn't do a lot for radiance. Most exfoliators are designed to loosen and remove dead skin cells and reveal glowing, healthy looking skin so I don't think this really needs to be a separate scrub on it's own. Both the other scrubs in this range work to do the pretty much the same thing as this one which to me makes this one a little bit obsolete. I don't find myself reaching for this as much as I probably should but it's only because I prefer the results that the other two are far more noticeable than this.

Overall I like these scrubs. Their not as harsh or stripping as other scrubs I've tried and apart from the Glow Scrub the results are noticeable from the first use. What I like about these scrubs is that whilst they have ingredients and work to aid a particular skin type, they can actually be used by all skin types, depending more on your skin's needs than it's type. The only pitfall with these is the price. Whilst the Pure Clay Masks came in at £7.99 for a 50ml pot, these Smooth Sugar Scrubs come in at £9.99 a 50ml pot. To me that seems like a price hike for the same sized pot of a product which to me should/would work side by side with the Pure Clay Masks. But don't let the price put you off, this scrubs are well worth every penny and I will for one be repurchasing them at any price when I need to. If you are in the market for a new scrub, I highly recommend you check these out. You won't regret it.


Friday 2 February 2018

Review: Maybelline Total Temptation Mascara

 
Every January Maybelline releases a new mascara. 2016 saw the release of the Lash Sensational Mascara and last year saw the release of the Push Up Angel mascara. Both of them were extraordinary mascaras and I didn't think they'd be able to top that. But 2018 saw the release of their Total Temptation and to say it's topped both of their previous releases would be an understatement.

Maybelline's Total Temptation Mascara is advertised as having their softest bristle brush ever that delivers a high impact, volumised, defined lash look that removes the need for false lashes. The formula is infused with Coconut Oil to nourish and condition lashes as you wear it.

I can't get over how good this mascara is. It's changed how my lashes look completely. The brush grabs each individual lash then lifts and separates them as you apply. It gives a wicked defined lash look that has both length and volume but isn't clumpy in the slightest. And unlike other mascaras it doesn't droop or fall flat almost instantly. The amount of compliments I've received on this mascara when I've worn it (everyday) are unbelievable. I couldn't believe trialling a new mascara could make such a change to my lashes.

This mascara isn't waterproof but doesn't flake, smudge or run even if you have a full blown cry (tried and tested) but is still easy to remove and doesn't require a ton of rubbing or eye make up to stay clear of panda eyes. And it's coconut oil infused formula means lashes don't feel crispy or like they could snap as you wear it. And I have to admit ever since I've been wearing this mascara, my lashes look like they've grown and the slightly sparse section I had in one of my lashes has decreased, not a lot but enough for me to notice.

If you're looking for a new mascara then I'd highly recommend checking this one out. It's results are outstanding and it doesn't let you down a few uses in, in fact, it gets even better the more you use it. Coming in at £8.99, it's one of Maybelline's pricier mascaras but in my opinion it's well worth every penny and I've already gotten my cost per wear out of this product.