Tuesday 23 April 2019

Recipe: Chocolate Peanut M&M Cookies

I love peanut M&M's and brought a pouch of them a couple of months back intent on creating some sort of recipe with them. And then I completely forgot about them, until I ran out of Mini Eggs to squeeze in one last Easter recipe and couldn't find any anywhere. That's when I remembered I had these. Pair that with my urge to make cookies, it turned out to be a match made in heaven. With these cookies you get that delicious chocolately goodness that has a nutty, crunch in every other bite. I'd like to say that I really enjoyed making these but considering my stand mixer broke halfway through and I'm still waiting to hear back about my warranty, I have to say there have been many more recipes I've enjoyed making more.

Ingredients 
- 150g Salted Butter, softened
- 80g Light Brown Muscavado Sugar
- 80g Granulated Sugar
- 2 Tsp Vanilla Extract
- 1 Egg
- 225g Plain Flour
- 30g Cocoa Powder
- 1/2 Tsp Bicarbonate Of Soda
- 1/4 Tsp Salt
- 140g Peanut M&M's

Method 
1- Pre heat your oven to 180C. Line several baking trays with greaseproof paper/baking parchment.
2- Into a bowl place the softened butter, granulated and muscavado sugar. Beat until smooth and creamy, taking care to beat out any lumps of sugar as you go.
3- Add your vanilla extract and egg then beat again. I always take this point as an opportunity to scrape around the sides of the bowl so you don't have any mixture unincorporated.
4- Sieve the cocoa powder, bicarbonate of soda, salt and plain flour into the bowl. If you're using a stand mixer I always advise taking the bowl off for this part. It saves a lot of time and hassle and you should hopefully have less to clear up afterwards.
5- Beat everything until completely combined. It may look like it's not going to become anything but just give it time and you'll end up with a delicious looking cookie dough that you'll want to eat before you even cook it.
6- Add your M&M's and beat again until they're fully incorporated.
7- Now it's time to shape your cookies. There are two ways you can go about doing this, firstly you can do it with your hands but it's gets very sticky very quickly. Or secondly you could use a batter scoop to scoop out an equal amount of dough so that your cookies may not all end up being circular, they will be all the same size. Evenly place your balls of cookie dough on the trays so they have room to drop and expand as they cook.
8- Once you've filled your trays; usually around three for me, pop them in the oven and bake for 10-15 minutes or until the edges are slightly firm. I recommend keeping a firm eye on these ones particuarly as cocoa powder tends to make them cook quicker and the slightest bit of overcooking them will make them a little dry.
9- Once they're cooked, leave to firm up on the trays then transfer to cool completely on a wire cooling rack.
10- Now enjoy. You can easily enjoy them when they're still warm or have a little more patience than me and wait for them to cool completely before devouring them all.

Monday 22 April 2019

GRWM: Remembering The Movies

Earlier this month me and mum went to see Remembering The Movies, a dance performance featuring Janette and Aljaz from Strictly Come Dancing. It was an amazing night that I thoroughly enjoyed, some of which came from more than the performance. My self confidence has been and is still quite low so when my hair, make up and outfit turned out better than expected, I found myself enjoying the night more than I thought I would, so I thought I'd share it with you.

Primer
Yes I know this is way too many primers to be using in one go but trust me, this is ridiculous combination works wonders on my skin and helps keep my make up looking fresh all day long. I start of with the Barry M Hydro Fix Primer Water, followed by the Maybelline SuperStay Primer and Maybelline Master Prime Anti-Redness Primer, finished off with the Loreal Infallible Magic Essence Primer Drops. The combination of all four; yes I said four, smoothes, hydrates, reduces redness and creates the perfect tacky base to apply foundation over top.

Foundation
For foundation I went in with not one but two foundations. And before you think I'm insane but I only used two to create my perfect shade. F1 in the Revolution Conceal And Define Foundation is a little too light for me whilst F2 is a little too dark so the pair mixed together makes my perfect shade. I love the coverage you get with this foundation. It's very high coverage but doesn't leave skin looking or feeling cakey. Plus it blends out like a dream and stays put all day long, something I'd expect with all those primers underneath.

Concealer 
For concealer I went in with two and yes I know I have a problem with using mulitple items when one would suffice but I like how these two work to reduce the appearence of my dark circles whilst brightening the under eye area. I layer the Maybelline Fit Me Concealer over the top of the Maybelline The Eraser Eye and blend it all out with my damp beauty blender. I also like to take a little of the Fit Me Concealer down the centre of my face to brighten and add a little more coverage where my foundation can sometimes disappear without reason.

Brows
For brows I only had one product I reached for. The E.L.F Brow Pencil is my holy grail brow pencil. It's just so easy to fill in any sparse patches whilst creating an amazing defined brow with minimal fuss. I also appreciate the nicely sized spoolie on the other end that brushes out just the right amount of product without leaving you with any new sparse patches.

Lashes 
For my lashes I started off by giving them a really good curl with my eyelash curlers, followed by a coat of the Benefit They're Real Tinted Lash Primer. I love how this helps to keep lashes definition and volume without being heavy like a mascara would. And over top I applied a good layer of the Loreal Volume Million Lashes So Couture. I'd actually forgotten how much I loved this mascara until recently. It's barrel micro bristle brush catches every lash and pushes them up to create a defined lash look that is eye catching yet not over the top.

Lips 
A last minute change to my outfit meant a last minute change of lip product. I was originally going to go with a nude lip but after finding a new top to wear, I changed it to a warmer berry lip. Firstly I lined my lips with the Barry M Lip Liner in Blowout. It came from a limited edition lip kit so I'm sorry to anyone who liked how this looked. Barry M lip liners are ridiculously creamy though and glide effortlessly along the lips. I always overline my lips slightly just so they look a little more even and once I was happy with the shape of them, I went in with the Maybelline SuperStay Matte Ink in Founder. These lipsticks don't budge, at all. I ate dinner before we went to the show, didn't top it up and it was still in one piece when I got home a good seven hours later. Sure they're a bitch to remove but the longevity and vividness of each shade is well worth it.

And here's the final look. I apologise for the mess around me but I was more focused on making sure I had a decent selfie over whether you could see my bra in the background. For my outfit I teamed my faithful black super skinny, super high waisted jeans from Primark with this striped t-shirt also from Primark. It was the plum stripes in this top that made me change my lip colour last minute and I'm so glad I did. I paired it all with my new oversized denim jacket from Marks And Spencers and some VANS.

My necklace is this cute little Scorpio necklace from Primark. I picked it up originally in gold because that's all they had and I couldn't leave it behind but I have since picked it up in silver as well. And the best bit, it only cost £2.

And finally for scent, I finally opened my new Rosie For Autograph Wild Floral EDP. This is light yet feminine and floral with a sweet undertone that makes it perfect for Spring/Summer nights. I also absolutely adore the bottle which is very vintage inspired and looks great on my desk with my other perfumes.

Wednesday 17 April 2019

Recipe: Easter Shortbread

I absolutely love shortbread. I used to mostly eat it around Christmas when it's in every shop you look in but now since I've realised I can make my own that tastes almost as good as shop brought, I can't stop making it. And today I'm back with my Easter Shortbread Recipe which is essentially a basic shortbread recipe shaped like bunnies but they looked cute and I couldn't resist sharing them.

Ingredients 
- 115g Butter
- 55g Caster Sugar
- A Pinch Of Salt
- 175g Plain Flour

Method
1- Pre heat oven to 180C. Line two baking trays with baking paper.
2- In a bowl place your flour, sugar and salt.
3- Add your butter and rub together until the mixture resembles breadcrumbs. This doesn't take as long as you expect but if you want to make it quicker, you can easily put this all together in a food processor and blitz it together.
4- Continue to rub together until it forms a dough. This won't take long but if you do find your dough breaking or not coming together at all, add a little water or milk as a binding agent. However don't add too much or your dough will be wet and again won't come together easily.
5- Once you have your dough, place it on a lightly floured surface and roll it out until it's a 1/2 inch thick. Take care to flour your rolling pin as well as it might stick to the dough and you'll end up tearing a hole out of it as your rolling it out.
6- When you're happy with the thickness of your dough, take your bunnyshaped cutters and cut out as many shapes as you can, rerolling your dough when necessary to get the most out of it.
7- Place your shapes onto your prepared baking tray and bake for 10-15 minutes or until they're golden brown. When you take them out, you want the edges to be firm but the inside to still be a little soft, they'll soon firm up as they cool and you'll end up with delicious melt in the mouth shortbread.

Tuesday 16 April 2019

Recipe: Mini Egg Cookies

Around Easter the shops are filled with the typical confectionary and cakes. Yet in my opinion they're overpriced and overrated when you can easily make a tasty and cute looking Easter treat at home. And this year that's what I've done. I've not allowed myself to be sucked in by the various treats on offer in shops and have made my own. I started with Mini Egg Rocky Road, Mini Egg Rice Krispie Nests and today I'm following them both up with Mini Egg Cookies.

Recipe 
150g Salted Butter, softened
80g Light Brown Muscavado Sugar
80g Granulated Sugar 
2Tsp Vanilla Extract 
1 Egg 
225g Plain Flour 
30g Cocoa Powder
1/2 Tsp Bicarbonate Of Soda
1/4 Tsp Salt 
150g Mini Eggs
Method 
1- Pre heat your oven to 180C. Line several baking trays with greaseproof paper/baking parchment. 
2- In a mixing bowl place the softened salted butter, granulated and muscavado sugar and beat until smooth and creamy. This may take a while as you don't want any lumps of sugar left in your mixture. 
3- Add the vanilla extract and the egg and beat again. This is where I take the opportunity to scrape around the sides of the bowl so that everything gets fully incorporated into the mixture. 
4- Sieve the salt, bicarbonate of soda, cocoa powder and flour into the mixture. I advise either using a pre sieved flour to save time or if your using a stand mixture, taking the bowl off the base and sieving it that way. It's a lot less messy, something you'll be grateful for later. 
5- Beat until everything is combined and you have the makings of cookie dough in your bowl. It may take a few minutes to start looking like something but the patience is worth it. 
6- Add your mini eggs and beat again until combined. I usually start adding it to the mixture with my stand mixer then taking it off the base and giving it a final mix with a silicone spatula so that everything is combined and nothing is left sitting up the sides of the bowl. 
7- Now it comes to making your cookies. You can easily use your hands to roll little balls of dough together but it can be messy and more likely to make a smaller batch of cookies. I like to use a batter scoop to make my cookies, they just come out more even and you'll be able to create a larger batch of cookies as each ball of dough will be the same size. 
8- Bake in the oven for 10-15 mins or until the edges of the cookies are firm to the touch. Don't worry if the centres are still a little wobbly, they'll soon firm up once they're out of the oven. 
9- Leave to cool on the tray for a few minutes before transferring to a wire cooling rack to cool completely. Allowing them to firm up on the tray means that each cookie is less likely to break when you transfer them to the cooling rack. 
10- Then all that's left to do is enjoy them. I quite like a couple of these with a cuppa whilst I catch up on my social media.

Thursday 11 April 2019

Recipe: Cream Egg Cupcakes

Let me start this off by saying I can't stand Cadbury's Cream Eggs. There's something about the insides that is just to sickly for me to handle and that's saying something considering the sweet tooth I have. Yet the rest of my family adore them and after seeing a picture of a recipe similar to this on Pinterest, I thought that I'd treat them all by making them some Cream Egg inspired cupcakes.

Ingredients
For The Cakes
- 100g Stork
- 100g Caster Sugar
- 100g Self Raising Flour
- 25g Cocoa Powder
- 2 Eggs

For The Buttercream
- 200g Butter
- 320g Icing Sugar
- 2 Tsp Vanilla Extract
- 1 Tube Of Orange Dr Oetker Gel Food Colouring
- A Smidge Of Milk
- 6 Cream Eggs

Method 
1- Pre heat oven to 180C. Line a twelve hole muffin tin with paper cases or if you're using baking cups like I did, place them on a flat baking tray.
2- Into a bowl place the sugar and the stork. Cream together until pale and fluffy in texture. You can use either a stand mixer or a silicone spatula to do this so that you get a really creamy. fluffy texture.
3- Add one egg and a tablespoon of flour. Beat until everything is combined and then repeat with your second egg.
4- Once both of your eggs have been added, fold in the rest of your flour and the cocoa powder. This is the only part of the recipe where slow and steady wins the race. Overbeating the mixture at this point will knock out any air you've already built up and you'll end up with cupcakes that don't rise much.
5- Spoon your mixture into your prepared cases/cups and bake in the oven for 20-25 minutes or until a skewer comes out clean. Leave them to cool in the tin for five minutes and then transfer over to a wire cooling rack to cool completely.
6- Now it's time to make the buttercream. Into a clean bowl place the butter and beat until soft, smooth and creamy.
7- Sieve in half of your icing sugar and beat until combined. Then repeat with the rest of your icing sugar, beating until fully combined. It's key to scrape around the bowl repeatedly so that there aren't chunks of icing sugar sat unmixed in your buttercream.
8- Add your vanilla extract and beat until combined. Now is the best time to get a feel of your mixture. You'll quickly be able to tell if it's going to be stiff to pipe or if it's just right. If you feel it's a little stiff then add a smidge of milk and beat until fully combined.
9- Separate your buttercream in half. Add the orange food colouring into one bowl and beat until combined. There is not right or wrong when it comes to the colour of your buttercream. I kept my quite pale to try and match the inside of a cream egg but if you want yours to be brighter then just add more food colouring.
10- Prepare a piping bag firstly with a 2D Flower Nozzle then with alternating spoonfuls of your two different colour buttercreams. When you pipe it onto your cupcakes, you'll get a two tone swirl effect something akin to what the inside of a cream egg looks like when bitten or broken into.
11- Pipe onto your now cooled cupcakes. Cut a cream egg in half and add place on top of your buttercream. I'd advise buying more cream eggs than you actually need so that if there are any unfortunate accidents you'll still have enough to decorate your cupcakes.
12- Once you've decorated your cupcakes, leave to set and then enjoy.

Monday 8 April 2019

Recipe: Mini Egg Rice Krispie Nests

Happy Monday! As a kid one of my favourite parts about the build up to Easter was getting to make Rice Krispie/Cornflake Cakes. And even at the ripe old age of twenty six I still love it. So today I'm sharing with you the recipe for them, it's perfect if you are just looking for a bit of nostalgia or looking for something to do with the kids over the Easter holidays.

Ingredients
- 400g Dairy Milk or Milk Chocolate
- 300g Rice Krispies
- 296g Mini Eggs

Method
1- Line two twelve hole muffin tins with paper cases. Even though you aren't cooking these, the tins will help them keep some sort of shape as they set.
2- In a bain marie, melt your milk chocolate over a low heat. I know it's tempting to turn the heat right up but you'll end up burning the chocolate. Slow and steady definitely wins the race with this one.
3- Once your chocolate is melted, pour over your rice krispies and mix until everything is covered in chocolate. It may seem like you need to melt more chocolate but you don't. 400g is enough, it just takes a little patience and elbow grease to get it done.
4- When everything is finally covered, spoon into your paper cases and decorate with the mini eggs. I went with three on the top of each nest as two seemed too stingy and four seemed like an overload. It also meant I had the perfect amount of mini eggs, even if I did help myself to a couple inbetween decorating them.
5- Leave to set and then enjoy. Or if your me, leave to set, tell your stepdad he can't have any repeatedly, photograph as quickly as possible and then watch as they get devoured.

Friday 5 April 2019

Clothing Wishlist

 
I literally don't know what's going on with me at the moment. I'm having a moment where I just want to go clothes shopping all the time and experiment with my style, which for me is a big jump in the right direction. Normally I stick to a rotating wardrobe of basic t-shirt or jumper paired with black jeans. And I want a change, as I've gotten older I've realised that there are times when a t-shirt with a Marvel or Disney character slapped across it aren't appropriate and that I should probably start dressing a little more my age. And over the last few weeks as I've knuckled down on the hunt for a perfect wedding guest dress, I've found myself doing a little window shopping and quite a bit of it is styles I'd have never looked at twice before. So today I'm sharing with you my latest clothing wishlist with pieces from the likes of Marks And Spencer and ASOS.

M&S Pure Linen Checked Shorts £35
I don't wear shorts, I used to when I was younger but as I've gotten older I've just lost the confidence to wear them. Yet these white checked shorts from M&S really caught my eye. They're 100% linen so I don't know how comfortable they'd be but what really drew me to them is how they sit on the waist and how long they sit on the thigh. I don't really like my thighs but these look as if they could sit at a flattering length on them which would encourage me to wear shorts more, especially during Summer. However they are 35 which seems a bit much for a pair of shorts and knowing my like I'll drop something down them or sit in gum. I may try them on when I'm in M&S next, just out of curiousity.

Per Una Oversized Pure Cotton Denim Jacket £39.50
I don't do jackets. Ask anyone I know and they'll tell you I don't do jackets. Even in the dead of Winter when it's freezing, I'll still just be wearing a big oversized jumper. But when I saw this oversized denim jacked on the M&S website, I fell in love. It looks to be the perfect denim jacket and the best bit, it's oversized. It's a little more than I'd usually happily pay for a jacket but it looks perfect, I'd just need to work out what to wear it with without rocking double denim.

M&S Collection Square Neck Camisole Top £15
I always struggle to find a nice camisole that's not too tight around the bust or too low cut either. And this square neck camisole looks like it could be the answer to all my problems. It doesn't look like it's been too. stitched in around the bust area, which means it could be quite flattering for a lady with a larger bust.

 M&S Collection Scoop Neck Relaxed Fit Vest Top £6.50
I love a good vest top but a lot of the time they are made of that horrid stretchy, clingy material that is so unflattering and end up going baggy around the bust. So this inexpensive basic vest from M&S is right up my street. It's exactly the kind of top I'm looking for to wear when I go and see Carrie Underwood in July. And yes I'm beyong excited!

M&S Collection Square Neck Camisole Top £25
This top is gorgeous. I've actually seen it in Marks and Spencers but haven't had the time to try it on. I love how it's cut with a slight peplum at the bottom the doesn't cling to any areas you don't want to highlight. The tortoishell buttons are a nice on trend touch and the white makes it perfect for Summer.

M&S Collection Embroidered V-Neck Long Sleeve Tunic £27.50
I honestly don't know what's drawn me to this top but by god it's gorgeous. It's very boho yet effortless and not too embellished that you can't wear it during the day. I really like how the sleeves have a slight volume to them but come down to a button cuff so they don't become too voluminous. It looks like the perfect top to wear as the weather gets warmer, cool and on trend but not showing too much skin.


M&S Collection Faux Leather Zip Detail Biker Jacket £45
I don't do jackets, I mentioned it earlier in the post but again when I saw this faux leather biker jacker I knew I had to at least go in store and try it on. Again it's a little more than I'd normally like to pay but I'm starting to learn that you get what you pay for with clothing. This would look good paired with a t-shirt I have my eye on from ASOS that I plan on wearing to Shawn Mendes in a couple weeks.


M&S Collection Floral Print Button Front Waisted Dress £35
I already own this dress. I brought it this weekend just gone to wear to a wedding I'm going to in June. I didn't originally plan on buying this dress but after having tried on eight dresses that ripped a massive hole in my self confidence, this dress easily sewed that hole back up and just screamed at me to buy it. It's a floaty style which means I'll have plenty of room to eat and won't require the dreaded spanx to flatter my figure. It doesn't show any of my bust which has been the biggest issue when dress shopping and the cute fringed sleeves cover the tops of my arms which I don't mind showing but am also happy to keep covered. I just had to share this with you as it's gorgeous, more so in person and would be a great addition to any Summer wardrobe.


M&S Collection Pure Linen Checked Ankle Grazer Trousers £39.50
2019 was the year I decided I wanted to wear bottoms that weren't jeans. And I've quickly learnt that it can be a struggle to find some that don't sit up your ass cheeks, aren't too long and have plenty of stretch in the thigh department. Matalan had some amazing leopard print trousers but they were way to long for me and as I'm not a big heel wearer I had to pass. Yet these ankle grazers look like they could be right up my street. The only problem could be the stretch in them as linen is known for not being very forgiving but they're definitely worth trying on.


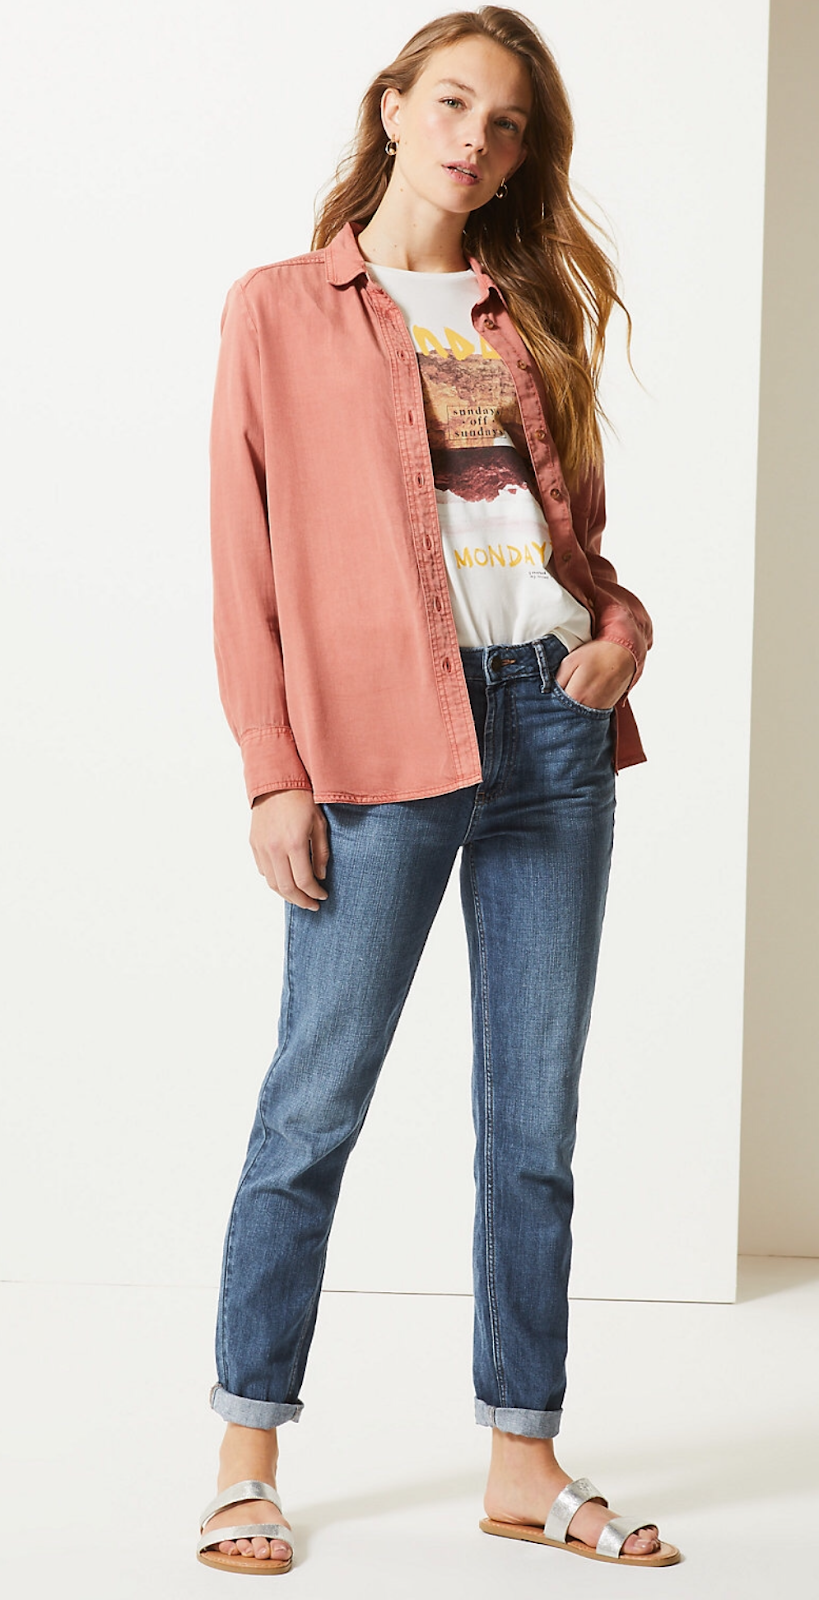
M&S Collection Mid Rise Boyfriend Ankle Grazer Jeans £29.50
2019 was also the year I said I was going to take a step back from wearing my standard black skinny jeans and try different colours and different styles. So far I've managed to change from black skinny jeans to blue skinny jeans but I spotted these in M&S the other day and I'm in love. As a lady with larger thighs, I don't always go for looser fitting jeans as they have a tendency to make me look bigger than I actually am but these boyfriend fit jeans look as if they could have that loose fit without being too oversized and baggy. They come in two washes and I love both, even though they're both lighter than the normal shade of blue I'd happily wear when it comes to jeans.


Neon Rose Plus Relaxed T-Shirt With Fleur Graphic via ASOS £16
I don't tend to order many clothes off of ASOS but when I saw this t-shirt I knew that had to change. Recently I've gone off of wearing big prints on the front of my t-shirt but this slightly watercolour based design just instantly caught my eye. I honestly can't tell you why I'm so drawn to this t-shirt but I'm really considering making a last minute order so I can wear this to see Shawn Mendes in a couple weeks.

ASOS Design Curve Button Through Top In Broderie £28
I don't do blouses or shirts. I don't really like collars and how they accentuate my slight double chin but this collarless, cute Summer top with broderie anglaise is just gorgeous. Again it has a stunning button detail down the front and it's pattern is big enough to be noticed but not big enough to show too much flesh underneath. I can imagine this paired with some sliders and some blue skinny jeans would look stunning during the hotter months.

Wednesday 3 April 2019

Recipe: Mini Egg Rocky Road

I know I'm not alone when I say that Mini Eggs are hard to resist and that there's a likely chance that a good amount of them have been consumed before Easter is even a thought in anyone's mind. I for one am guilty of buying a bag for myself if I've had a particuarly hard day and it was one of these days that got me thinking what recipes would work well with the addition of Mini Eggs. The answer was a lot but I narrowed it down to three, simple yet delicious recipes, the first of which I'm sharing with you today.

Ingredients
- 200g Dark Chocolate
- 135g Butter
- 200g Digestives, crushed
- 100g Mini Marshmallows
- 100g Mini Eggs
- 2-3 Tbsp Golden Syrup

Method 
1- Grease and line a 18cm square baking tin with greasproof paper.
2- In a saucepan place the dark chocolate, butter and golden syrup.and melt together. Stir continuously so that nothing gets stuck to the bottom of the pan.
3- If you haven't already crushed your digestives, then crush them now. Don't worry if you have a variety of sized chunks, it'll just add to the end look of your rocky road.
4- Add the biscuits, marshmallows and mini eggs to your chocolate mixture. Combine everything with a wooden spoon/spatula until everything is thoroughly coated in chocolate.
5- Pour into your prepared tin, using you spoon/spatula to spread it out evenly.
6- Chill for a minimum of two hours, checking intermittedly, in the fridge. Once it's completely set, cut into squares or slices and enjoy. 

Tuesday 2 April 2019

Review: Loreal Rouge Signature Matte Liquid Lipstick

I love a good liquid lipstick, sure they're not flattering ninety nine percent of the time but I love them. So when I heard Loreal were releasing a new matte liquid lipstick that was comfortable to wear whilst still being highly pigmented, I was instantly curious.

Advertised as a ultra matte liquid lipstick that packs a bold colour pay off alongside a lightweight finish, the Signature Matte Lips come in twelve stunning shades from neutral everyday shades to bright in your face reds. They're supposed to not smudge, flake or dry lips out and are supposedly able to last for twenty four hours.

That all sounds amazing and I so badly wanted to like them but they fell just short of the mark for me. Sure it was a highly pigmented colour that looked stunning on and felt like I was wearing nothing but that for me were the only two positive selling points. It certainly didn't last twenty four hours, in fact it didn't even last four hours on my lips and all I was doing was talking as always and sipping my regular frappucino. And yet it disappeared and I was left with that horrid ring of lip liner around my lips making me look like a 90's throwback wannabe, no wonder it felt like I wasn't wearing anything. Other than that it was drying and left my lips feeling uncomfortable, which was only made worse when it came to removing it. Removing these is a bitch. Sure the initial layer comes off but it leaves behind a stain that no oil cleanser or micellar water can remove without a strong amount of scrubbing. And afterwards you're left with sore, red lips that need even more TLC.

These may look beautiful, the packaging may be sleek and the colour range may be divine but these liquid lipsticks are really not worth the money. I had such high hopes for these and they were just disappointing. I'd advise steering clear of these and saving your money to buy a better quality liquid lipstick, even if that means paying a little bit more.

Monday 1 April 2019

What I Read: March

Pinch, punch first of the month. Happy April 1st everyone! Today I'm back with my slightly late What I Read wrap up. March was a very hit and miss month for me bookwise and I only managed to finish two books even though I opened and attempted to read five different books throughout the month. I had a hard time being hooked in by any of them apart from these two but even at that, one was rather disappointing whilst the other was good but not astounding.

A Place Called Perfect- Helena Duggan
The first book I finished in March was A Place Called Perfect by Helena Duggan. Initally the cover was what caught my eye the most but after reading a preview on iBooks, the story itself had a pretty good premise. Following the story of Violet and her arrival in a town called Perfect, you follow her as she tries to adjust to living in this picture perfect town that certainly doesn't have space for an inquisitive and somewhat rebellious little girl such as Violet. I'm not too sure if this is marketed as young adult or more younger reading but I thoroughly enjoyed both the narrative and the writing style. It was an easy read and I found I devoured it in a day. It had the right mix of mystery, suspense as well as a little bit of humour and finished on a brilliant cliff hanger that made me add it's sequel straight to my Amazon basket. Out of the two books I've read this month, this is the one I recommend reading.
 

This Lie Will Kill You- Chelsea Pitcher
And the second book I finished this month turned out to be a massive disappointment even though it had a good premise and could have been an amazing thriller. This Lie Will Kill You centers around five teens who are all hiding their own secret concerning the death of a fellow student last year. That's until they're invited to a murder mystery party with the chance of winning $50,000. However it soon becomes aparent that the only murder mystery they'll be taking part in occured last year when they're secrets come out and their lives are at stake. Sounds pretty good doesn't it? Well it wasn't that good. It had so much promise but it fell so short of it. All the reveals were done before we'd even got halfway through the book and as soon as they'd entered the house it was clear who was behind it all. It got very confusing slipping between different perspectives and tenses, each characters individual arc getting lost in the main narrative even though the writer tried their hardest to introduce each character seperately. And the ending! Don't get me started on the ending. I just didn't get it. I even went back and reread the last five chapters and it still didn't make sense. Maybe if it had been building to a sequel of sorts then it would have made more sense but as a stand alone novel, it made absolutely no sense to me and seemed to come out of nowhere. Maybe if you've read it or reading it, you'll understand it more than me but for me it was too confusing and put me that little bit deeper into the reading slump I've been in.